The view (above)


Spreading compost with the excavator

Marina and Stella head for the play set after a picnic lunch at the job site.


Stella smiles high atop her daddy's rock wall project

Luc is currently making a very long rock wall that's about 4 feet tall. The wall frames the home owner's property line, then curves around to meet the driveway. Stella and I stopped by on a sunny weekday to record the progress. Luc is using his excavator to place the large rocks and shape the earth. It is an often times tedious process, but it is incredibly rewarding to see the wall in all of it's magnificence! It may stand for hundreds of years, who knows? It will likely last longer than the house itself. That is some kind of responsibility!
Visit Luc's landscaping blog at: http://www.livelylandscapes.blogspot.com
or for a free job estimate call: 360-914-6022


 Placing rocks after dumping off many many yards of dirt (see below pics) to make a planter and a circular driveway.
 BEFORE: with rock pile and dirt piles. A lot more dirt to go . . .
 And more dirt . . .
 AFTER: There it is with the dirt smoothed and rocks placed to make the planter.
 This newly constructed home in the woods called out for a beautiful rock wall to frame the entryway and bring the elegant elements of nature from the surrounding woods in toward the home. Luc created this short rock wall, which will be the foundation for landscaping around the home.
  Above: the rock wall is under construction. Luc's hand tools are in the foreground.

 The rock wall will act as a retaining wall for what might become a planting bed or a beautiful lush lawn. This time of the year there is a lot more water to work with both in the soil and raining down during work days. Above you will see some water that has puddled due to digging and earth moving that has taken place.
 Above: measuring the length and width of the wall: a line marks the angle at which to build the back section of rock wall.Completed rock wall!
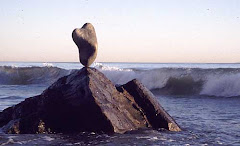
 Above: the Upper Rock wall. This wall serves as a retaining wall for a (now) flat grassy area. This location was originally a sloped grassy area that turns into a vertical drop (right after where the photographer is standing). At the bottom of the vertical drop is the Lower Rock Wall (pictured first on this post), then the homeowner's parking and after that their home. While Luc was working on this wall, he had to be especially careful with how he placed the rocks as to not let one go rolling down hill into their home! All went well and the Upper Rock Wall now raises the slope so that there is a flat, grassy outdoor space that the homeowners can use for entertaining and for enjoying the beautiful sea view.
 ABOVE: working on the Lower Rock Wall. Placing the base level rocks and sifting through the rock pile to piece the puzzle together (BELOW).
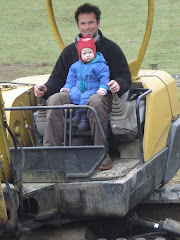
 BELOW: Luc with baby daughter Marina in the loader that he used to move dirt to make the Upper Rock Wall and flat grassy area.
 BELOW: A lot of dirt to move!
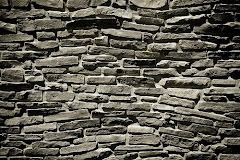
 "After" picture of the rock wall (above), only a partial picture of the wall. There is also a staircase in the middle of the wall to the left of this picture.
 BEFORE the rock wall & stairs (above)
 (ABOVE) finished wall, stairs, and garden beds.
 The sandy mud (above) and the placing of cottage stone for the staircase.
 ABOVE: Luc's excavator and the wall-in-progress (unfinished). You can get an idea of the length of the wall in this picture, even though some of it is not included to the left.
 (Above) Luc's finished retaining wall on Verbena. A sight to see. Pictured below is also a rock staircase that scales the hillside on the far right. Read further to see the process that went in to creating the wall.
 (Above) Some of the large rocks that will be used for the wall.
 (Above) Beginning to place rocks to make the wall's foundation. Behind the wall will be gravel to aid in the water drainage. This is a process of sorting rocks, placing and sometimes re-placing.
 (Above) Still lots of work to do! The top level of rocks on the wall is not yet completed. The wall will also curve more arond the right side and there will be a cottage stone walkway on the far right from the top of the hill to the bottom of the rock wall.
 (Above) Wall-in-progress. Lots of clean-up and "polishing" to be done.
 I like how the wall ends in a clean angle (above). Now for work on the staircase which will be on the right.
 Finished staircase (above)finished rock wall (above). Whew! A job well done!

+138.jpg)